- Published on
- ← Blog——
Your first Stimulus Controller — Learn Stimulus in Ruby on Rails by building a toggle.
- Authors

- Name
- Harrison Broadbent
- @hrrsnbbnt
So, you're new to Stimulus and want to try it out in your Ruby on Rails app. Or perhaps you just need a simple toggle pattern to follow. Either way, you're in the right place.
Today we're going to build a simple toggle like this —
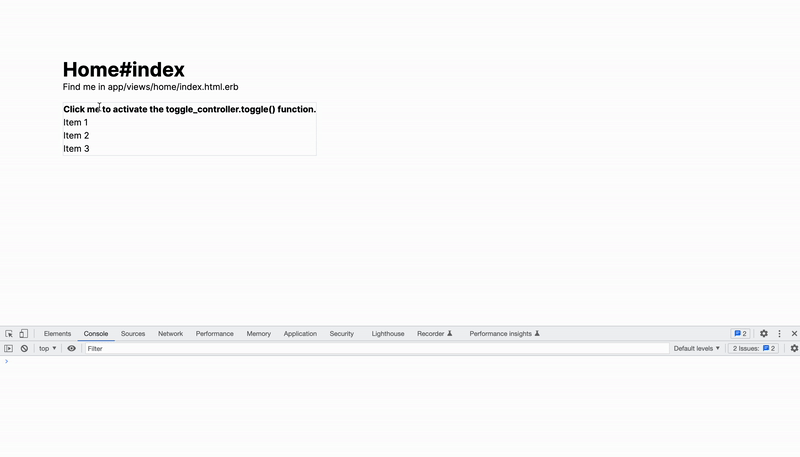
Table of Contents
- So... what is Stimulus?
- Under the hood — how does Stimulus work?
- Creating our sample Stimulus + Rails App
- Exploring the included hello_controller in our Rails app
- Your first Stimulus controller — Building a Toggle controller
- Remixing the Toggle controller
- Toggling the background colour
- Toggling multiple classes
- Conclusion
So... what is Stimulus?
From the Stimulus Handbook —
Stimulus is a JavaScript framework with modest ambitions. Unlike other front-end frameworks, Stimulus is designed to enhance static or server-rendered HTML—the “HTML you already have”—by connecting JavaScript objects to elements on the page using simple annotations.
Basically, Stimulus is how we add frontend Javascript code into our Ruby on Rails views. Rather than using a full-blown frontend framework like React, we can sprinkle in Stimulus as we need it. Paired with Hotwire, we can build interactive, live-updating frontends without leaving our Ruby on Rails app!
If you don't think you need a full Javascript frontend like React or Vue, but you want to add some interactions (ie: a toggle, like we're building today), Rails + Stimulus was made for you.
You can check out the Stimulus Reference Site for more details.
Some handy links to complement this article —
Under the hood — how does Stimulus work?
At a high level, Stimulus is a Javascript library that continuously monitors your Ruby on Rails views, waiting for HTML data-controller attributes to appear.
Stimulus handles connecting the correct controllers, passing the event, and parsing any variables you've declared in your HTML.
If you're using a Rails 7 app (like we do in this article), Stimulus will already be set up for you —
- Inside
app/javascript/application.js, all your Stimulus controllers get exported. - Inside
importmap.rb, using the new Rails 7 importmaps, your Stimulus controllers get imported into the Javascript for your Rails app withpin_all_from "app/javascript/controllers", under: "controllers". - Finally, inside
application.html.erb, all your importmaps get added to your views with<%= javascript_importmap_tags %>.
If you're on an older version of Rails, you can find installation instructions here — https://github.com/hotwired/stimulus-rails
Now that we know a bit about Stimulus, let's start using it!
We're going to generate a sample app to use for this guide, then we're going to explore the hello_controller.js that is included in every new Ruby on Rails app.
After that, we'll build V1 of our toggle_controller.js, before improving it in V2 of our Toggle Stimulus controller.
Creating our sample Stimulus + Rails App
Before we can start using Stimulus, we're going to generate a sample Rails app for this tutorial.
Make sure you're using Rails 7, since it includes Stimulus by default.
In this guide, we're going to use TailwindCSS so include that too. Tailwind is important here! It works extremely well with Stimulus (you'll see why soon).
In your terminal, run —
rails new first_stimulus_controller_toggle --css tailwind && cd first_stimulus_controller_toggle
We also want to create a simple controller and view for us to work with.
We can use a rails generator to create a home_controller with an index.html.erb view (and the corresponding route) —
rails g controller home index

      create  app/controllers/home_controller.rb
       route  get 'home/index'
      invoke  tailwindcss
      create    app/views/home
      create    app/views/home/index.html.erb
      invoke  test_unit
      create    test/controllers/home_controller_test.rb
      invoke  helper
      create    app/helpers/home_helper.rb
      invoke    test_unit
I've also built a GUI tool for Rails Generators — Rails Generate Controller Command Builder
Finally, let's start up our development server with —
./bin/dev
And head to http://localhost:3000/home/index. If everything went well, you'll see this page —

Nice! This is going to be our (very simple) base to play around with Stimulus.
Before we dive into building our Toggle Stimulus controller, did you know Rails actually ships a simple Stimulus controller by default? It's called hello_controller.js, and I'm going to walk you through that first, to help explain some basic Stimulus concepts.
If you're interested in learning more about the
bin/devscript that we used to launch our processes, I wrote more about it here — Procfile.dev, bin/dev and Rails 7
Exploring the included hello_controller in our Rails app
Rails ships with a Stimulus controller setup for us. If you look inside app/javascript/controllers you'll see application.js and hello_controller.js.
We'll look at hello_controller.js soon.
For now, open up application.js and set application.debug = true -
application.debug = true
Head back to the browser, open your developer tools (F12 for most browsers), and you'll see our application_controller starting up —
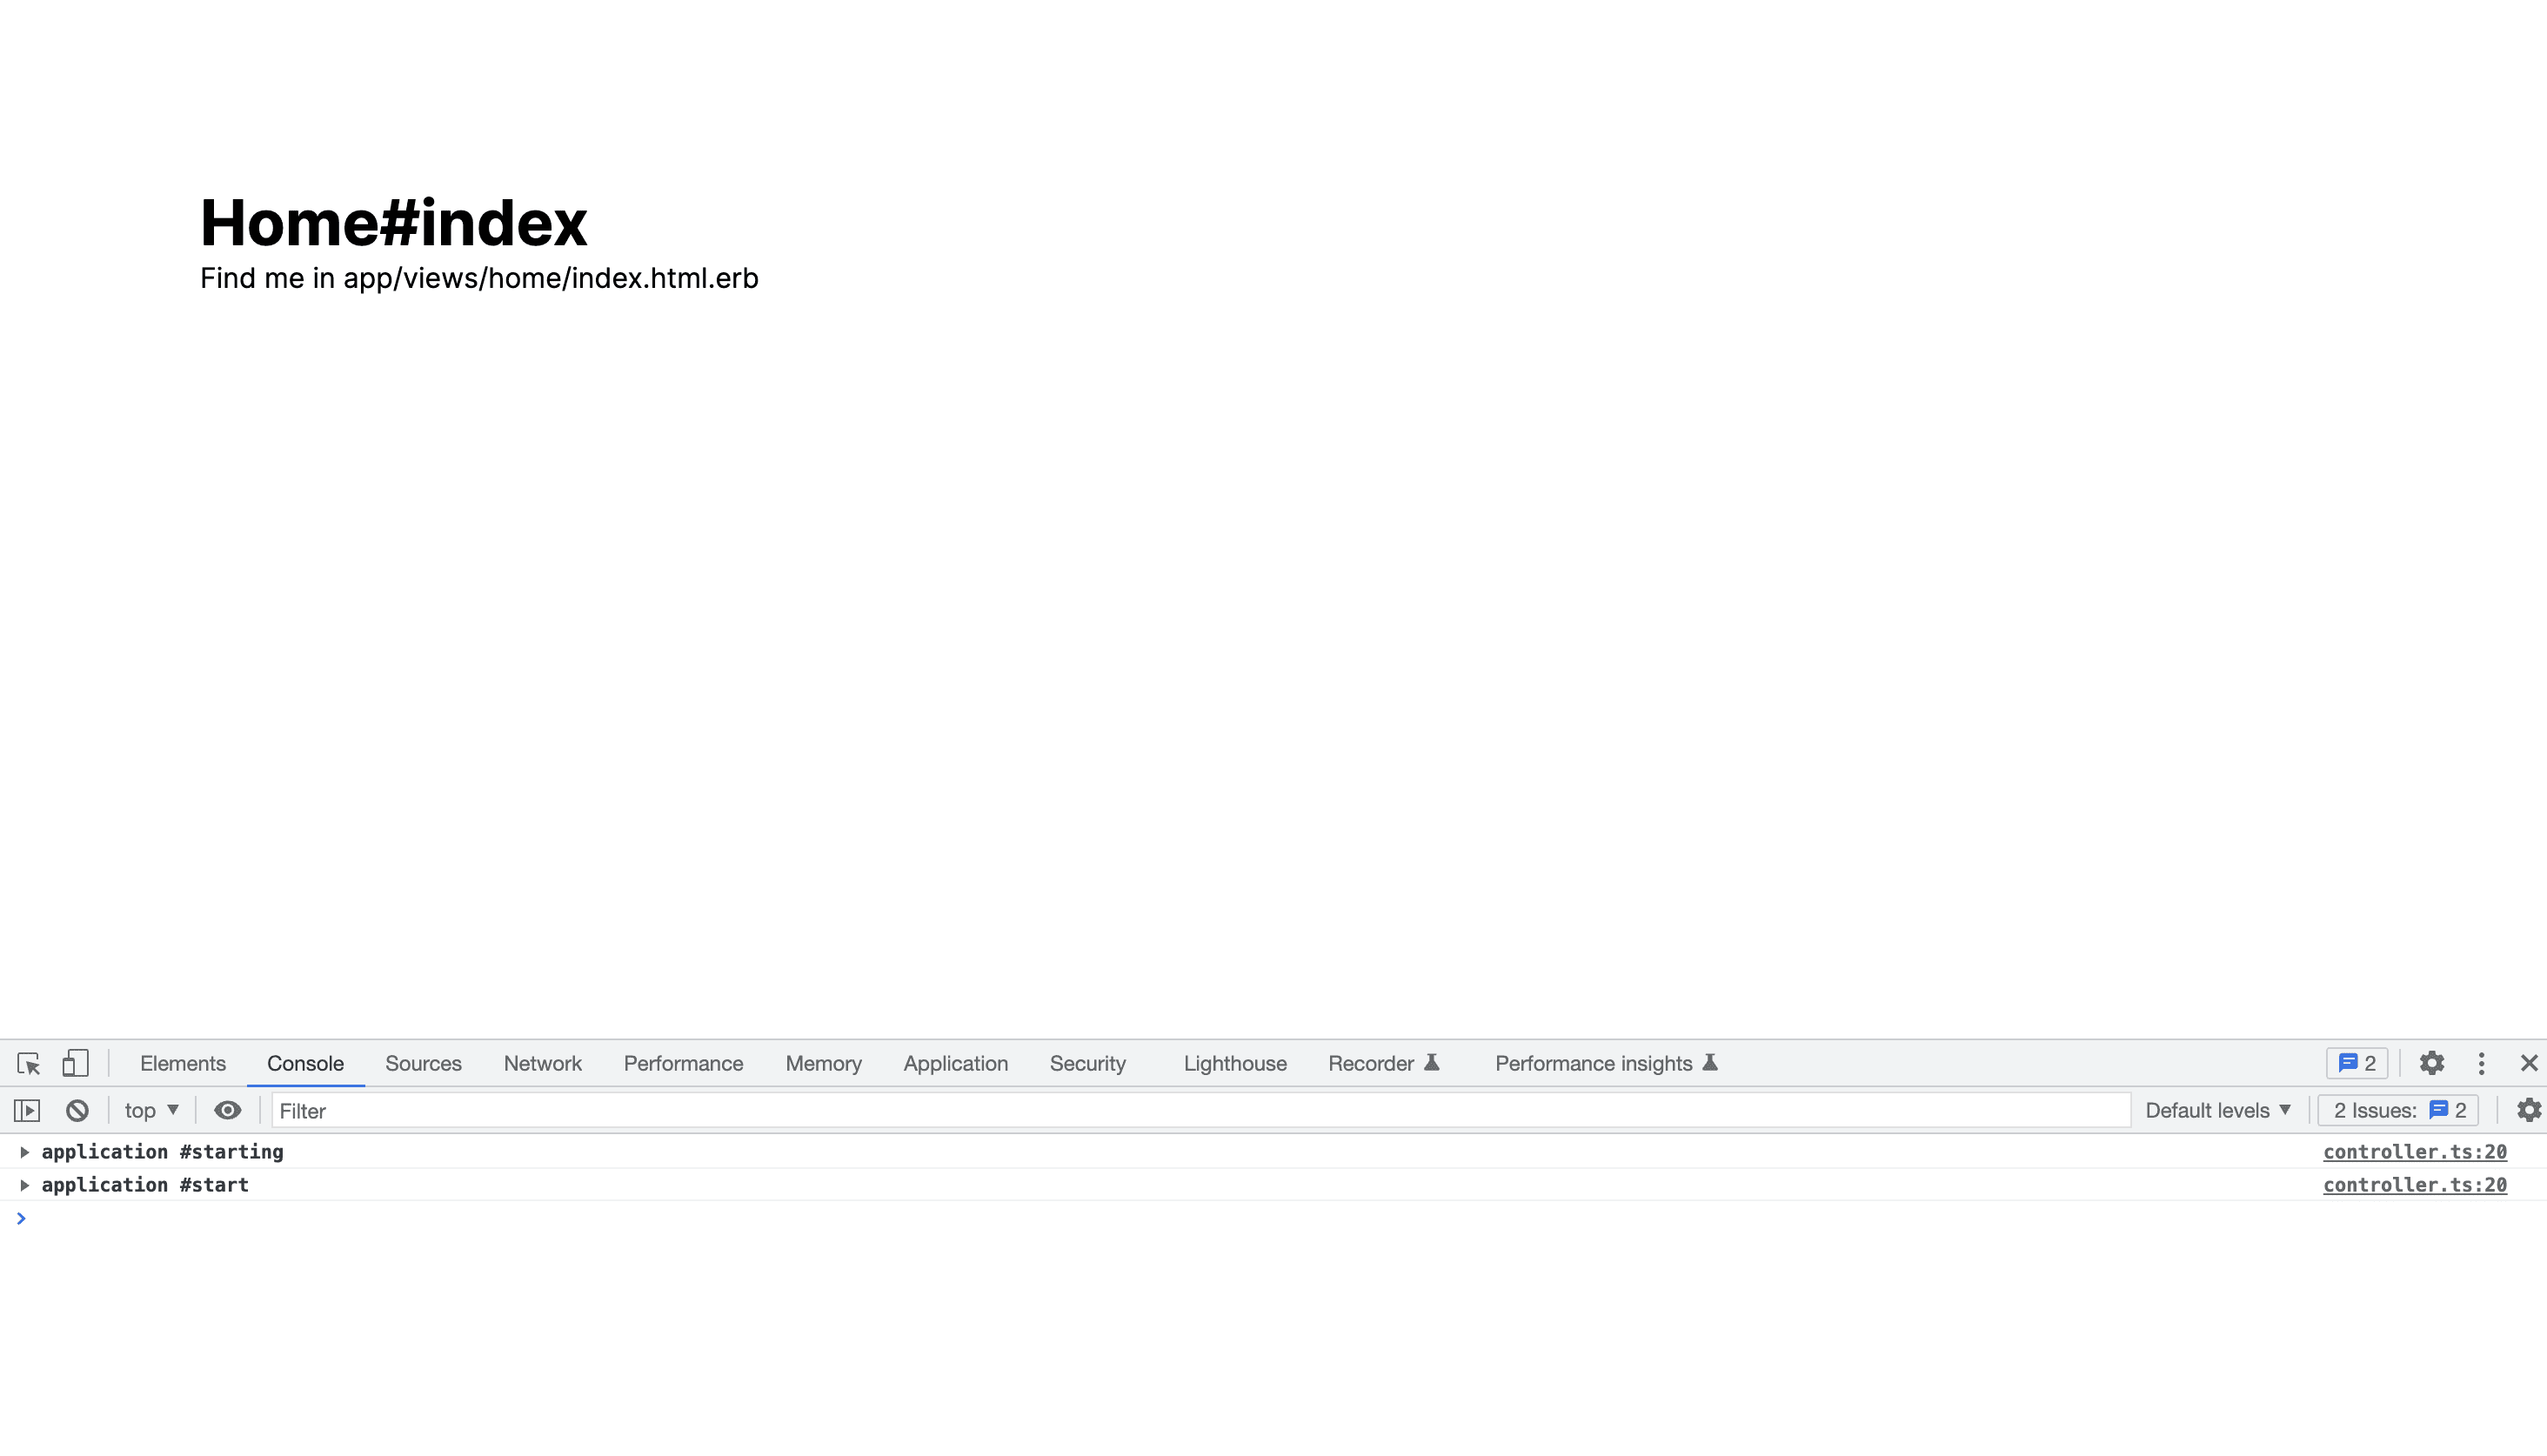
If you've got this far, congratulations! You're now (technically) using Stimulus in your Rails app! Obviously, nothing is happening yet. Let's change that by playing around with the included hello_controller.js.
This is what's inside the hello_controller.js -
import { Controller } from "@hotwired/stimulus"

export default class extends Controller {
  connect() {
    this.element.textContent = "Hello World!"
  }
}
It's an extremely simple controller, but it will help me illustrate some Stimulus basics.
So what does it do?
Our hello_controller has a single connect() function, known as a lifecycle callback.
When our controller Connects to the browser DOM (when we load up our page in our browser), it's going to set the textContent of its associated element to Hello World!.
Let's add a console log to the controller to see what's happening, like so —
import { Controller } from '@hotwired/stimulus'

export default class extends Controller {
  connect() {
    console.log('hello_controller.js: ', this.element)
    this.element.textContent = 'Hello World!'
  }
}
And adjust our home/index.html.erb view to be -
<div>
  <h1 class="text-4xl font-bold">Home#index</h1>
  <p>Find me in app/views/home/index.html.erb</p>

  <p data-controller="hello">This text will change!</p>
</div>
We've added a <p>, and we've registered the hello_controller to that element using data-controller="hello".
Reload the page again and you'll see the contents of the <p> will change from "This text will change!" to "Hello World!" —
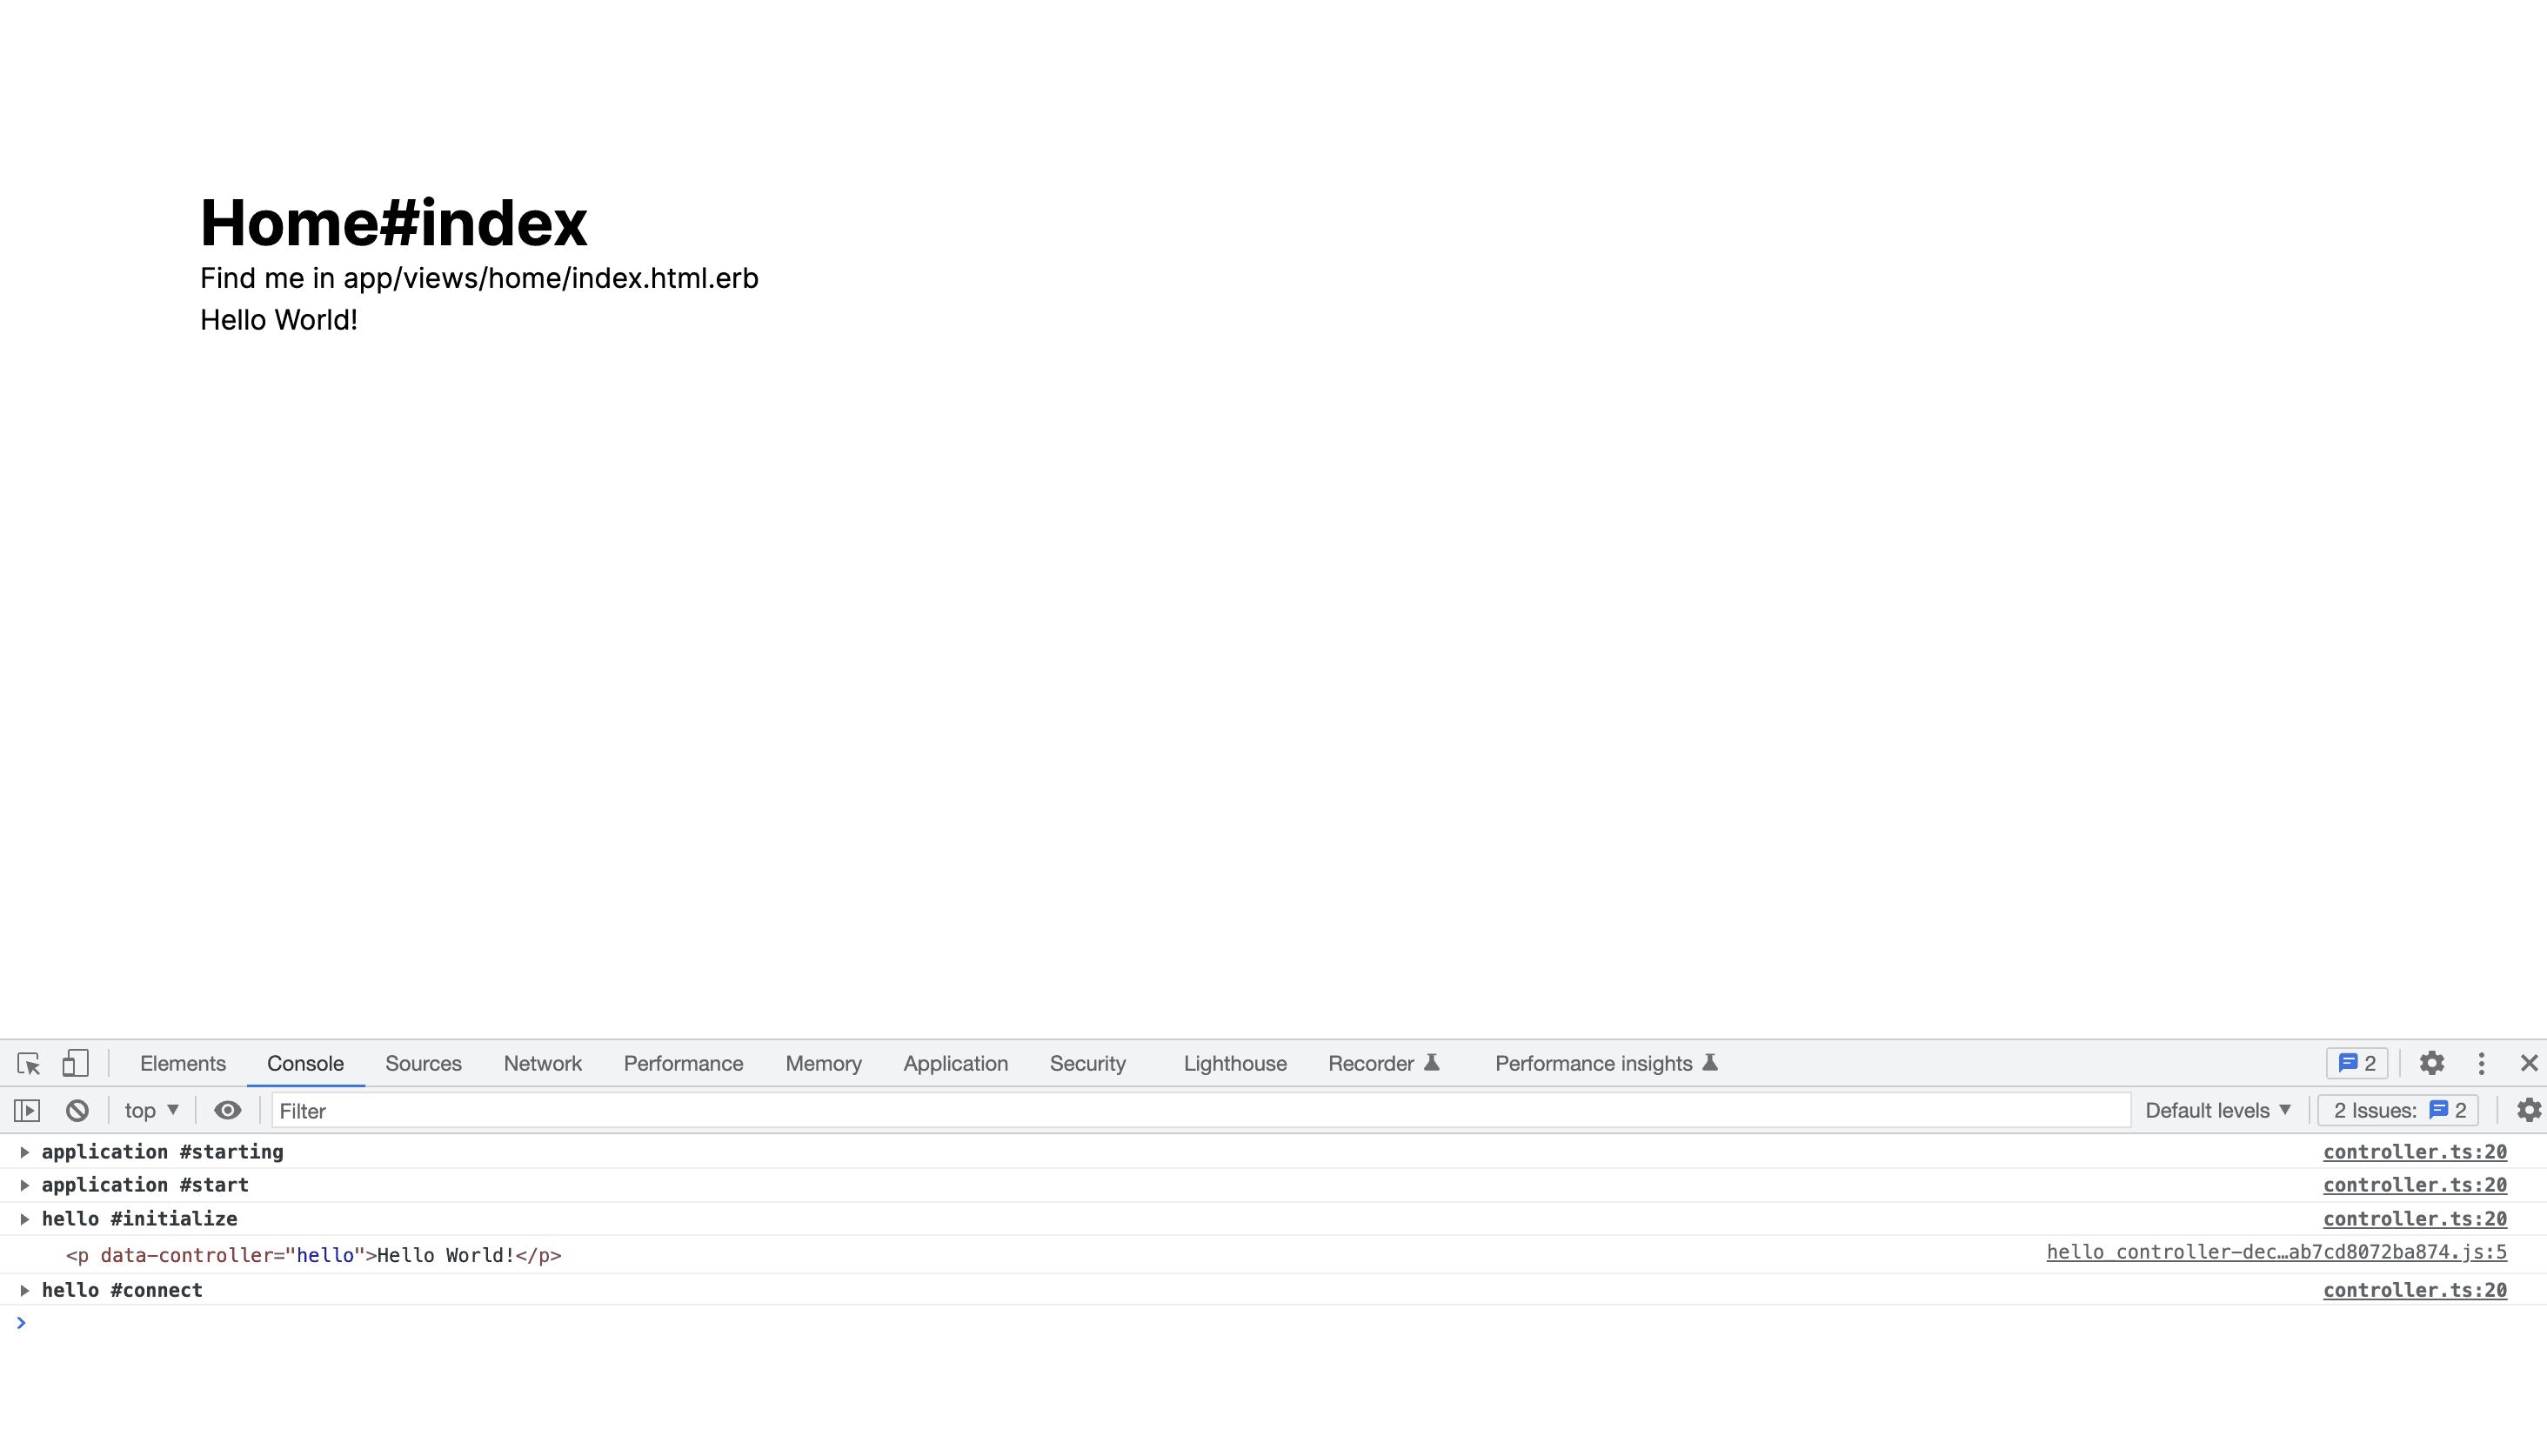
And in our browser console, we see -
hello #initialize
hello_controller.js:
<p data-controller='hello'>Hello World!</p>
hello #connect
Our hello_controller Stimulus controller is able to access the contents of the <p> tag through this.element, since we mounted the controller to that element in our view -
<p data-controller="hello">This text will change!</p>
Stimulus invokes the connect() method anytime the controller connects to the DOM. When we load our index page, the controllers connect() method is triggered, which in this case runs console.log, then updates the textContent of our <p> to be Hello World!.
You can see that even with a simple controller, there's a lot going on!
We've covered everything in this example controller though. It's time to start building our Toggle controller!
Your first Stimulus controller — Building a Toggle controller
This is what we've been working towards! We're going to build this —
Our controller will do a few things —
- Let us indicate an HTML class to
toggleonto thecontentof our controller. - Let us indicate the
contentwhich will be toggled. - Let us set the controller to be initially active (
toggled) or inactive (nottoggled).
To start with, we can use a built-in Rails generator to create our Stimulus controller —
rails g stimulus toggle
      create  app/javascript/controllers/toggle_controller.js

rails stimulus:manifest:update
You can use my GUI command builder for this too! Rails Generate Stimulus Controller Command Builder
Running this will first generate our Stimulus controller, which for now looks like this —
import { Controller } from '@hotwired/stimulus'

// Connects to data-controller="toggle"
export default class extends Controller {
  connect() {}
}
We also update our stimulus:manifest, to make sure our toggle_controller gets imported. Running rails stimulus:manifest:update adds this to javascript/controllers/index.js —
...
import ToggleController from './toggle_controller'
application.register('toggle', ToggleController)
Note the instructions say at the top of the index.js — you should run rails stimulus:manifest:update whenever you create a new Stimulus controller, to make sure it's included in your Rails views.
Now, let's build our actual controller.
I want to show you how we would build a "good" Stimulus controller. Stimulus controllers are generally considered "good" when they're relatively generic and configurable. Keeping them generic and configurable makes it easy to 'sprinkle' them into our app as we need them. Essentially, we want to write generic controllers so we can reuse them throughout our Rails app.
We'll start with an OK first pass at our Toggle controller, and then refactor and improve it.
A first pass at building our Toggle controller might look like this —
import {Controller} from "@hotwired/stimulus"

// Connects to data-controller="toggle"
export default class extends Controller {
  static targets = ["content"];

  toggle() {
    let hiddenClass = "hidden"
    this.contentTarget.classList.toggle(hiddenClass);
  }
}
And we would use it in our index.html.erb view like this —
<div>
  <h1 class="text-4xl font-bold">Home#index</h1>
  <p>Find me in app/views/home/index.html.erb</p>

  <div data-controller="toggle" class="my-4 border">
    <span data-action="click->toggle#toggle" class="font-bold"
      >Click me to activate the toggle_controller.toggle() function.</span
    >
    <ul data-toggle-target="content">
      <li>Item 1</li>
      <li>Item 2</li>
      <li>Item 3</li>
    </ul>
  </div>
</div>
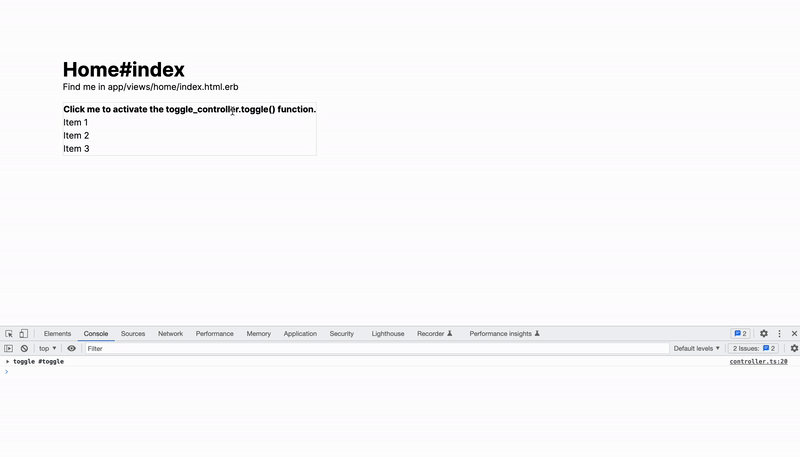
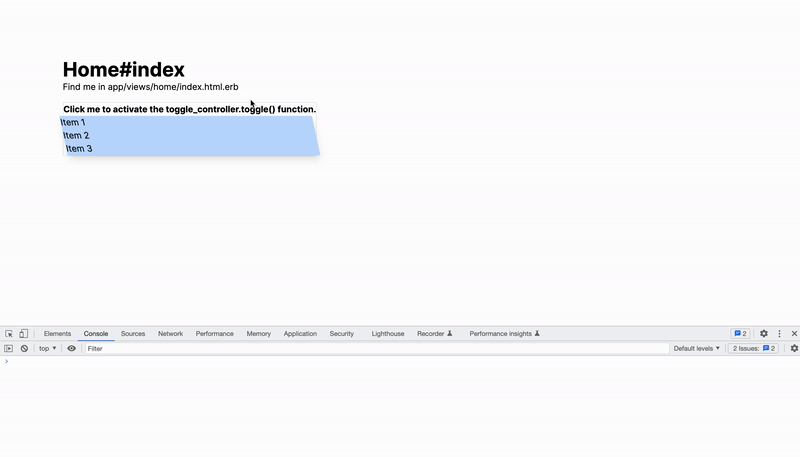
Which lets us do this (don't forget to refresh your page) —
Our Toggle Stimulus controller works! But what's actually going on?
Let's start by looking at our index.html.erb view. We added this —
<div data-controller="toggle" class="border my-4">
  <span data-action="click->toggle#toggle" class="font-bold">Click me to activate the toggle_controller.toggle() function.</span>
  <ul data-toggle-target="content">
    <li>Item 1</li>
    <li>Item 2</li>
    <li>Item 3</li>
  </ul>
</div>
There's a few things going on here —
- We created a
<div>to wrap our list, and attached the toggle controller to it with<div data-controller="toggle">. - We created a
<span>with adata-action="click->toggle#toggle"attribute. This tells Stimulus to trigger thetoggle_controller.toggle()function whenever theonclick()HTML event is triggered. Learn more at https://stimulus.hotwired.dev/reference/actions . - We created a
<ul>with adata-toggle-target="content"attribute. This lets us reference the<ul>element in our Stimulus controller.
There's not much to it. Our HTML is pretty simple — just a couple of data attributes, and our Stimulus controller is connected to our Rails view, with the correct triggers and access to our data.
Looking back at our toggle_controller, you can see how everything fits together —
import {Controller} from "@hotwired/stimulus"

// Connects to data-controller="toggle"
export default class extends Controller {
  static targets = ["content"];                         // setup a target for our content, so we can toggle its class

  toggle() {
    let hiddenClass = "hidden"                          // we toggle the 'hidden' TailwindCSS class (https://tailwindcss.com/docs/display#hidden)
    this.contentTarget.classList.toggle(hiddenClass);   // toggle():  https://developer.mozilla.org/en-US/docs/Web/API/DOMTokenList/toggle
  }
}
We do a couple of things here —
- We first define a
static targets = ["content"];. This lets us referencethis.contentTargetlater in our controller, which lets us target the children of our HTML element withdata-toggle-target="content". In our case, it lets us target the<ul>element since we have<ul data-toggle-target="content">. - We create a
toggle()function inside our controller. This is the function that gets called bydata-action="click->toggle#toggle"on our<span>element. - We create a variable to store the class we want to toggle onto our
contentTarget. We use thehiddenclass from TailwindCSS, which toggled thedisplay: hiddenCSS attribute. Toggling classes is a common pattern in Stimulus, which is why I recommend using Tailwind if you can — it makes it a lot easier! - Finally, we toggle the
hiddenClassclass on ourcontentTarget(the<ul>element).
Note that we use
contentTarget, notcontentTargets. Stimulus supports both, which can be confusing!From the Stimulus docs, we can see that we use a singular term (
contentTarget) to get back a singular element.We would use the plural (
contentTargets) to get back an array of elements. We would usecontentTargetsif all our<li>elements haddata-toggle-target="content"attributes because we'd need to toggle thehiddenclass for each of them. Since we're toggling our<ul>though, we can use the singular to keep our code cleaner.
That's the breakdown! With our Stimulus controller setup correctly, and our HTML data attributes set, our toggle_controller can correctly mount itself, access the correct target, and toggle the hidden class on the element.
We're done! ... Well, not quite.
Our toggle_controller works, but there are a few improvements we can make. For one, we've hard-coded the hiddenClass variable — what if we want to toggle something else? Currently, we can't use our controller for this.
We also said earlier we wanted a way to have the toggle be initially active or inactive, which we haven't done yet.
Let's add these improvements now.
This is our adjusted toggle_controller.js Stimulus controller —
import { Controller } from '@hotwired/stimulus'

// Connects to data-controller="toggle"
export default class extends Controller {
  static targets = ['content'] // setup a target for our content, so we can toggle its class
  static values = {
    // setup values that we reference in our controller, passed in from our HTML
    class: String,
    initialActive: Boolean,
  }

  connect() {
    if (this.initialActiveValue === true) {
      // use the initialActiveValue passed from data-toggle-initial-active-value to optionally toggle our class
      this.toggle()
    }
  }
  toggle() {
    let classToToggle = this.classValue // use the classValue passed from data-toggle-class-value in our HTML
    this.contentTarget.classList.toggle(classToToggle) // toggle():  https://developer.mozilla.org/en-US/docs/Web/API/DOMTokenList/toggle
  }
}
We've added a couple of new things here -
- First, we added a
static valuesvariable and defined the values and types we want to pass into our controller.- We could also have set default attributes by doing something like
initialActive: { type: Boolean, default: false }.
- We could also have set default attributes by doing something like
- Then, we accessed our variables by doing things like
this.initialActiveValueandthis.classValue. Stimulus automatically grabs these variables from our HTML, and parses them into the correct type. - We also added our
connect()function back in, which conditionally calls thetoggle_controller.toggle()function, letting us set the toggled attribute by default.
We also need to make a tiny adjustment to index.html.erb —
<div>
  <h1 class="text-4xl font-bold">Home#index</h1>
  <p>Find me in app/views/home/index.html.erb</p>

  <div
    data-controller="toggle"
    data-toggle-initial-active-value="false"
    data-toggle-class-value="hidden"
    class="my-4 border"
  >
    <span data-action="click->toggle#toggle" class="font-bold"
      >Click me to activate the toggle_controller.toggle() function.</span
    >
    <ul data-toggle-target="content">
      <li>Item 1</li>
      <li>Item 2</li>
      <li>Item 3</li>
    </ul>
  </div>
</div>
You can see that in our index.html.erb file, we only changed the <div>. We added the data-toggle-initial-active-value="false" and data-toggle-class-value="hidden" attributes to our HTML.
Adding these data attributes let us configure the class we toggle, and whether the toggle is initially active, wherever in our views that we initialize the controller.
This is powerful!
It means that in one view, our toggle_controller can have a certain behaviour, and in a different view, a totally different behaviour! (ie: toggling different classes in different views.).
This was one of our earlier aims, and something I wanted to get across to you — Stimulus controllers are better when they are configurable! Rather than writing lots of different controllers for slightly different behaviour, it's a lot easier to write generic controllers which we can make adjustments to with different data attributes.
We're done with our basic toggle controller. Congratulations!
I'm not done yet though — If you want some examples of what I mean by "tweaking the behaviour in our views", read on!
Remixing the Toggle controller
By making our toggle controller configurable, we're able to adjust its functionality in our views, rather than hard-coding behaviour to the controller.
Since we've configured our controller to accept a value for class and initial-active, we can do things like this —
Toggling the background colour
Since our Stimulus controller lets us pass in the data-toggle-class-value, we can easily adjust the behaviour to toggle a different class.
If we set data-toggle-class-value="bg-red-500" and data-toggle-initial-active-value="true", we can toggle the background colour of our list, instead of showing/hiding it. We can also set it toggled on by default.
Making these changes in index.html.erb gives us this new behaviour —
We didn't change our Stimulus controller at all!
By adjusting the data attributes we passed in, we were able to completely change the behaviour of our Toggle controller.
Toggling multiple classes
By making some small adjustments to our Stimulus controller, we can toggle multiple classes, rather than just one.
We can adjust our controller like this —
import { Controller } from '@hotwired/stimulus'

// Connects to data-controller="toggle"
export default class extends Controller {
  static classes = ['toggle'] // add classes attribute to our controller. Use data-toggle-toggle-class in HTML.
  static targets = ['content']
  static values = { initialActive: { type: Boolean, default: false } }

  connect() {
    if (this.initialActiveValue === true) {
      this.toggle()
    }
  }
  toggle() {
    this.toggleClasses.map((c) => this.contentTarget.classList.toggle(c)) // toggle each of the classes we passed
  }
}
Now, if we adjust our index.html.erb to pass in our TailwindCSS class strings like -
<!-- data-toggle-toggle-class="animate-pulse bg-blue-200 skew-x-12 shadow-lg" -->
<div data-controller="toggle" data-toggle-initial-active-value="true" data-toggle-toggle-class="animate-pulse bg-blue-200 skew-x-12 shadow-lg" class="border my-4">
See here for more info on the
data-...-classattribute — https://stimulus.hotwired.dev/reference/css-classes
We can do stuff like this -
🤯
Conclusion
I hope you found this article helpful! Stimulus controllers are a great way to make your Ruby on Rails apps feel more interactive.
If you found this useful, you might like checking out more of my Stimulus and Ruby on Rails posts on this blog.