- Published on
- ← Blog——
Deploying a Ruby on Rails App on Render with a Database, Redis, Sidekiq, and Cron Jobs
- Authors

- Name
- Harrison Broadbent
- @hrrsnbbnt
In this article, I'm going to show you how to deploy a Ruby on Rails app to Render, including a PostgreSQL database, Redis, Sidekiq, and Cron jobs. If you've never heard of Render, it's a great new-age Heroku alternative.
There are other articles covering some of this stuff, including the official Render docs, but they don't cover everything. In particular, the Render docs didn't cover Cron jobs, which I think are vital.
Table of Contents
Today, I wanted to share my experience setting up a decently complex Ruby on Rails app on Render. This experience came from deploying a previous side project called MONN.
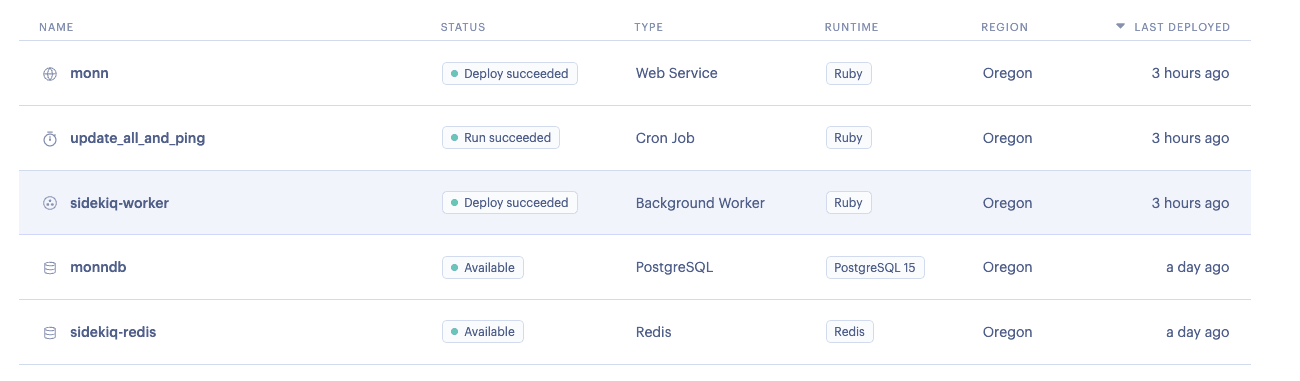
Heres a screenshot of the final Render dashboard —
Even though Render does have a guide on deploying Rails with a database, Redis, and Sidekiq, the guide doesn't cover how to set up Cron jobs to trigger Sidekiq tasks.
Leaving out Cron jobs is a pretty glaring ommission! Heaps of projects use them for triggering regular jobs (email sending, db cleanups, data syncing etc.), and they pair well with Sidekiq to accomplish this in a Ruby on Rails app.
So, in this blog post, I'll walk you through my journey of deploying a Rails app on Render with a database, Redis for caching and background jobs, Sidekiq for background job processing, and Cron jobs for running scheduled tasks.
Let's dive in!
The render.yaml Blueprint
The key to deploying my app on Render was to use a render.yaml file. This file serves as a blueprint for the entire application deployment, defining all the services and settings required.
After an hours or two of experimenting and tweaking, here's the full render.yaml file that I came up with:
# setup the database
databases:
  - name: monndb
    databaseName: monndb
    user: monn

services:
  # redis for cache and bg jobs
  - type: redis
    name: sidekiq-redis
    ipAllowList: [] # only allow internal connections
    plan: free # optional (defaults to starter)
    maxmemoryPolicy: noeviction

  # trigger bg jobs
  - type: cron
    name: update_all_and_ping
    env: ruby
    schedule: '*/5 * * * *'
    buildCommand: 'bundle install; bundle exec rake assets:precompile; bundle exec rake assets:clean;'
    startCommand: rake refresh_api_data:update_all_and_ping --trace
    envVars:
      # give access to db
      - key: DATABASE_URL
        fromDatabase:
          name: monndb
          property: connectionString
      - key: RAILS_MASTER_KEY
        sync: false
      - key: REDIS_URL # this must match the name of the environment variable used in production.rb
        fromService:
          type: redis
          name: sidekiq-redis
          property: connectionString

  # runs bg jobs
  - type: worker
    name: sidekiq-worker
    env: ruby
    buildCommand: bundle install
    startCommand: bundle exec sidekiq -C config/sidekiq.yml
    envVars:
      # give access to db
      - key: DATABASE_URL
        fromDatabase:
          name: monndb
          property: connectionString
      - key: RAILS_MASTER_KEY
        sync: false
      - key: REDIS_URL # this must match the name of the environment variable used in production.rb
        fromService:
          type: redis
          name: sidekiq-redis
          property: connectionString

  #  main app
  - type: web
    name: monn
    env: ruby
    buildCommand: './bin/render-build.sh'
    startCommand: 'bundle exec puma -C config/puma.rb -t 5:5 -p ${PORT:-3000} -e ${RACK_ENV:-development}'
    envVars:
      - key: DATABASE_URL
        fromDatabase:
          name: monndb
          property: connectionString
      - key: RAILS_MASTER_KEY
        sync: false
      - key: REDIS_URL # this must match the name of the environment variable used in production.rb
        fromService:
          type: redis
          name: sidekiq-redis
          property: connectionString
Now let me break it down for you and explain each of the five services that we initialize — a PostgreSQL database, Redis, a Cron Job, Sidekiq, and the main Ruby on Rails app.
1. PostgreSQL Database
First, I set up a PostgreSQL database for my Rails application. I specified the name, database name, and user like so:
databases:
  - name: monndb
    databaseName: monndb
    user: monn
This tells Render to create a PostgreSQL database named monndb, with a user called monn.
2. Redis
Next, I needed a Redis instance for caching and background jobs. I created a new Redis service and set some basic configurations:
services:
  # redis for cache and bg jobs
  - type: redis
    name: sidekiq-redis
    ipAllowList: [] # only allow internal connections
    plan: free # optional (defaults to starter)
    maxmemoryPolicy: noeviction
I defined a Redis service named sidekiq-redis, allowing only internal connections from other Render services. I chose a free plan for my Redis instance — perfect for small applications — and set the maxmemoryPolicy to noeviction so that no keys would be removed if the Redis instance became full.
3. Cron Jobs
One thing I couldn't find in Render's guide was how to set up Cron jobs to trigger my background jobs. So here's what I came up with:
# trigger bg jobs
- type: cron
  name: update_all_and_ping
  env: ruby
  schedule: '*/5 * * * *'
  buildCommand: 'bundle install; bundle exec rake assets:precompile; bundle exec rake assets:clean;'
  startCommand: rake refresh_api_data:update_all_and_ping --trace
  envVars:
    # give access to db
    - key: DATABASE_URL
      fromDatabase:
        name: monndb
        property: connectionString
    - key: RAILS_MASTER_KEY
      sync: false
    - key: REDIS_URL # this must match the name of the environment variable used in production.rb
      fromService:
        type: redis
        name: sidekiq-redis
        property: connectionString
I set up a Cron service with a schedule of */5 * * * * — this is crontab syntax for run every 5 minutes. So every 5 minutes, the job will run and trigger the following command - rake refresh_api_data:update_all_and_ping --trace.
In my case, it was important to pass in the DATABASE_URL, so that the job could interact with the database. I also passed in the REDIS_URL because my Rails app used Hotwire and Turbo frames to live update the frontend, so the job needed to be able to broadcast it's results to the frontend (which is handled by Redis).
I provided the necessary build and start commands to install dependencies and run the Rake task.
After that, Render took care of triggering this Rake task at the specified schedule.
4. Sidekiq worker
As my app relies on Sidekiq for background job execution, I had to set up a Sidekiq worker:
# runs bg jobs
- type: worker
  name: sidekiq-worker
  env: ruby
  buildCommand: bundle install
  startCommand: bundle exec sidekiq -C config/sidekiq.yml
      envVars:
      # give access to db
      - key: DATABASE_URL
        fromDatabase:
          name: monndb
          property: connectionString
      - key: RAILS_MASTER_KEY
        sync: false
      - key: REDIS_URL # this must match the name of the environment variable used in production.rb
        fromService:
          type: redis
          name: sidekiq-redis
          property: connectionString
My side project used Sidekiq for running a few different background jobs. The main ones were for syncing data with cloud APIs, pinging remote services, and sending emails with ActionMailer.
I created a worker service named sidekiq-worker, using the Ruby environment. The start command included a reference to my Sidekiq configuration file.
For the ENV, I made sure to pass in the REDIS_URL so that Sidekiq could read jobs from the Redis queue.
Render spun up the worker and took care of running the Sidekiq process.
5. Rails Application
Lastly, it was time to set up my main Rails application service:
#  main app
- type: web
  name: monn
  env: ruby
  buildCommand: './bin/render-build.sh'
  startCommand: 'bundle exec puma -C config/puma.rb -t 5:5 -p ${PORT:-3000} -e ${RACK_ENV:-development}'
  envVars: ...
I defined a web service named monn, utilizing the Ruby environment.
I provided the build and start commands to install dependencies, precompile assets, and run the main Puma web server.
The build command references the standard build script that Render recommends for a Rails app —
#!/usr/bin/env bash
# exit on error
set -o errexit

bundle install
bundle exec rake assets:precompile
bundle exec rake assets:clean
bundle exec rake db:migrate
When we deploy our app to Render, we just have to remember to add our RAILS_MASTER_KEY, so that we can decrypt our Rails Credentials file.
Conclusion
So there you have it! Using Render and a render.yaml file, I was able to successfully deploy the Rails app with a database, Redis caching, Sidekiq background job processing, and Cron tasks for scheduling.
It turned out to be a fun and rewarding experience, and I hope my story helps you deploy your own Rails app with ease.
Happy coding!